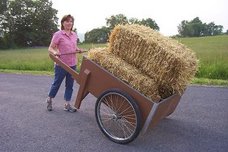
This web site (one of my first on the web) is now old, confusing, and totally outdated. I'm in the process of developing a new Planet Whizbang web site and will remove this entire site when it's ready. For now, you can still pick your way through these pages and learn about the cart. The good news is that the plan book is still in print and available from me (Herrick Kimball) for only $14.95 at THIS LINK . An inexpensive PDF download of the book is also available.
Tuesday, March 12, 2019

Friday, January 2, 2009
Announcing The 2008 Whizbang Cart Contest Winners
There were six entries in the 2008 Whizbang Garden Cart Contest. We have had the official drawing (from a hat) of the winners. They are as follows:
First Place Winner: David Larson in Connecticut wins a $100 gift certificate to a seed catalog company of his choice.
Second Place Winner: Bantry Bay Farm in New Brunswick, Canada, wins a $50 gift certificate to a seed catalog company of their choice.
Third Place Winner: Gabe Acrich in California wins a $25 gift certificate to a seed catalog company of his choice.
Fourth Place Winner: Dana Buckley in North Carolina wins a $25 gift certificate to a seed company of her choice.
Congratulations to each of the winners!
And to the other two entrants who did not win a prize but are, nevertheless, still winners in my mind.
The winners will be hearing from me in the next day or two. If you do not get an email from me, please send me an e-mail at: hckimball@bci.net
For those who would like to know how to build a Whizbang Garden Cart, check out my book, Anyone Can Build A Whizbang Garden Cart
First Place Winner: David Larson in Connecticut wins a $100 gift certificate to a seed catalog company of his choice.
Second Place Winner: Bantry Bay Farm in New Brunswick, Canada, wins a $50 gift certificate to a seed catalog company of their choice.
Third Place Winner: Gabe Acrich in California wins a $25 gift certificate to a seed catalog company of his choice.
Fourth Place Winner: Dana Buckley in North Carolina wins a $25 gift certificate to a seed company of her choice.
Congratulations to each of the winners!
And to the other two entrants who did not win a prize but are, nevertheless, still winners in my mind.
The winners will be hearing from me in the next day or two. If you do not get an email from me, please send me an e-mail at: hckimball@bci.net
For those who would like to know how to build a Whizbang Garden Cart, check out my book, Anyone Can Build A Whizbang Garden Cart
Saturday, November 22, 2008
David Larson's Connecticut Cart

David Larson in Connecticut has built himself a new Whizbang Garden Cart. As you can see from the pictures, it is a fine looking and very practical cart. Here are some comments excerpted from a couple of e-mails from David.
”Enclosed are a couple of photos of my Whizbang cart. As you can see,
my wife, Sandi, is enjoying the cart as well. I attached the legs on the
back with toggle head nuts so they can be easily removed and reaattached
via preexisting holes in the vertical position if needed.
I also created a workbench surface of 4 ft square plywood which collapses in
approx one half size by means of a piano hinge. It has two sets of ~2inch
square holes...one set is at the edge of the plywood allowing a flush fit at one
of the four sides; the other set is offset by 7 inches allowing a 7 inch overhang
on three of the four sides.
I must congratulate you on creating the finest set of plans I have ever seen. Once I rounded up the proper materials, I followed your plans almost to the letter and have been pleasantly surprised on how well everything has come together. Again, you have done a superlative job! Thank you!
I do believe your estimate of six hours to construct this wagon reflects your twenty years of carpentry expertise... It took me 2-3 times that and I have had some fair experience with woodworking projects. I am certainly not complaining....
I had a thoroughly great time with this project and am sure I will enjoy it for the next 40 years or so (I am only 66 yrs old at this point...).”
Nice job David. Thanks for the positive feedback and inspiring pictures. With only eight days until the 2008 Whizbang Garden Cart Contest deadline, you are officially entered. The drawing will be on January 1st 2009.

Saturday, November 15, 2008
A North Carolina Beauty...

Wow, there’s another beautiful Whizbang Garden Cart! That one was made by Dana Buckley in North Carolina. Dana wrote this about the plucker planbook:
"Thanks for writing such great, easy to follow instructions! It wasn't hard to build at all."And here is what she wrote about making the cart:
"I built this Whizbang garden cart with a little help from my husband and my dad (my dad has a table saw), but mostly by myself. I had a hard time finding the metal j-bead and I had to order the metal rod for the axle. No one around here had anything longer than three feet in stock. I think finding the j-bead was the hardest part of the project. I had wanted a nice garden cart for awhile, but when we got the horses this year, I really needed one. My daughter and I use it a lot. It is great to carry feed from the car to the barn and carry hay out to the pasture in the winter. It also makes a nice muck cart. I decided to stain it red to match the barn. But the wood I bought for the handles had such pretty grain, I couldn't cover it up. So I used a transparent, natural color stain on them. I think it turned out really nice."It sure did turn out really nice, Dana. Thanks for your inspiring example.
You are now officially entered in this year’s Whizbang Garden Cart Contest. Thanks

Sunday, November 9, 2008
Bantry Bay Farm's Whizbang Garden Cart

Congrats to Luke McLean at Bantry Bay Farm in Bayside, New Brunswick, Canada for building a Whizbang Garden Cart, and putting it to good use on their farm. Bantry Bay grows a variety of produce and sells direct to the community via a local farmer's market and CSA. The picture above shows the Bantry Bay Whizbang with a load of parsnip tops. I love to see pictures of the Whizbang at work!
Back in March of this year, Luke wrote the following in the farm's blog:
"Mike and I built a garden cart. Now, we didn't really know how to build a garden cart, but there was quite a bit of information on the internet, including a guy with his own blog and manual on how to build a good garden cart almost entirely from common building supplies. He calls it the Whizbang Garden cart. We ordered his manual and built ourselves a whizbang. I'm glad we did, because it's really a great cart. I doubt it would have been as durable or balanced had we built it on our own. We'll post some pictures at a later date. If you're interested in building your own, or just learning more about garden carts, here's his link: gardencartblog.blogspot.com"
Nice cart, Luke. Your Bantry Bay Whizbang is now officially entered in the 2008 Whizbang Garden Cart Contest.


Saturday, May 24, 2008
Tevye's Russian Whizbang Milk Cart
(2008 Contest Entry #2)

That “old” garden cart is actually not as old as it looks. I’ll let Gabe Acrich from Colfax, California tell the story:
"My wife Sarah has been putting on community theatre plays for many years. Sound of Music , Oliver etc. etc. Lots of adults and tons of kids. The kids pass the hat at the end of the play and all the money goes to a charitable organization. Well this year it's Fiddler on the Roof. The lead character and center stage the entire show will be "the Garden Cart". It will serve as the sewing table , the master bed, turned on it's end the wedding backdrop, the Sabbath table and last but not least Tevye's milk cart.
Now for the building of the cart. Everything except a fresh sheet of plywood and the wheels came from the boneyard. It's amazing how much I had in order to build this and that's prior to adding all the extra aged wood to make the cart appear authentic. We searched high and low on the internet for wheels. Too expensive, not authentic, or shipping was too high. We took a car trip from our home in N. California through Arizona to New Mexico. Not for wheels in particular but we did take the van just in case. On our last day in New Mexico , there they were, perfect. And 26 inches as an added bonus. We had forgotten the size we needed but would have bought almost any size and made it work.
The first cast party had a pile of wood and tools awaiting everyone. We built the whole thing in three hours with about 7 men. 2 build and five watch and drink beer. The greatest idea was the extra axle support added at the last minute. It looks just like the leg support but shorter. It comes down just a few inches below the cart bottom and the axle goes through it as well. It adds a good deal more support for these extra heavy wheels. (sorry ,you can barely see the top of it over the wheel in this picture) Except for the wheels and support, and all the extra wood for looks, we followed the plans exactly. Oh, we also widened the cart by 1 foot. No metal across the top either. We gorilla glued the heck out of everything. Let it dry and painted the plywood.
I'll send you I picture while it's up on stage but that's many months away."
Thanks Gabe. That’s a fine cart. I wish you the best with the play, and I wish you the best as Entry #2 in this year’s Whizbang Garden Cart Contest.
Friday, March 28, 2008
2008 Cart Contest Entry #1

John Hudson (a.k.a., The Ancient Mariner) built that smart-looking Whizbang Garden Cart pictured above. The photo below shows Mary Hudson (a.k.a., "The Boss" or "Head Mess Cook" or "First Mate") with the unpainted cart.
The Hudsons live in Alabama. These pictures, and John's comments below constitute entry #1 in the 2008 Whizbang Garden Cart Contest.

Here's What Mr. Hudson had to say about his Whizbang Cart:
"The famous or infamous cart is finished. Materials pretty much as in the plan. 5-ply Ext grade Douglas fir plywood. Douglas fir for the handles, the rest pine. Unable to get the thin J-bead. Most around here is plastic. Finally found some heavy metal j-bead, gauged out to 1/32 inch and edges rolled and crimped. Little harder to work. Had to drill holes. But did the job. Finished with two coats Behr solid color premium deck, fence and siding stain.
Couple of mistakes
1. I read with interest the use of duct tape for masking when gluing. I have plenty of duct tapes so I promptly grabbed some blue painters masking tape and carefully masked it. Not a Good idea!! My only excuse is old age. I turned 80 in November of 07.
2. I’m a fan of coated deck screws so where possible I bought them rather then the plain wood screws. The inch & 1/4 worked fine. Didn’t notice the 2 & 1/2 were #10 so fastening the bottom to the handles heard a crack Figured I might have drilled crooked. Did the next, another crack. Turned the cart over, saw two partial splits in my nice straight grained fir handles. Removed the offending screws. Dawned on me that these were size 10 rather then 8. Redrilled the pilot holes , repaired the cracked spots and all ok. Don’t have a table saw for ripping . Picked up a gadget (ACU-RIP) for my skill saw and was able to do the required rip in the two by four. The cart was made primarily for the wife. So she wanted barn red She will name it at a later date."
Nice Job John! Thank you for your sharing your Whizbang Garden Cart with the rest of the world. I hope it inspires others to get their cart done and enter it in the contest.
Tuesday, January 22, 2008
Announcing the 2008 Whizbang Garden Cart Contest
Build A Whizbang Garden Cart And You’re Eligible to Win One of Four Gift Certificates to a Seed Company Catalog
Grand Prize: $100 gift certificate to Pinetree Garden Seeds (or another seed catalog of your choosing)
Second Prize: $50 gift certificate to Pinetree Garden Seeds (or another seed catalog of your choosing)
Third Prize $25 gift certificate to Pinetree Garden Seeds (or another seed catalog of your choosing)
Fourth Prize: $25 gift certificate to Pinetree Garden Seeds (or another seed catalog of your choosing)
Note: Pinetree Garden Seeds is currently the only seed company catalog that sells the Whizbang Garden Cart plan-book.
Here’s How to Enter The Contest
1. Build your own Whizbang Garden Cart using the plans found in the book, Anyone Can Build a Whizbang Garden Cart
2. Take a picture of your finished cart. The picture must show the cart in a natural setting (for example, a garden), and there must be at least one person in the picture.
3. Do one of the following:
a) Send the picture of your cart, along with your name and address , by postal mail to: Whizbang Books, P.O. Box 1117, Moravia, NY 13118
b) Post the picture of your cart, along with a short explanation about it to your blog, web site, or another internet location with its own linkable internet web address. Then e-mail the location to: whizbangbooks@bci.net The link must be viewable until at least the end of 2008.
Contest Deadline
All entries for the 2008 contest must be received by December 1st of 2008.
Here’s How Winners Will Be Chosen
Everyone who enters the contest will have their name written on a slip of paper and put into a box. On December 31st of 2008, Prize winners will be picked at random as follows:
The Grand Prize and Second Prize winners will be picked from a box containing the names of people who posted their cart picture with an explanation about it to the internet.
Then, the remaining names in that box will be added to the box of names from people who sent their photo through the mail. From these two combined groups, the Third Place and Fourth Place winners will be picked.
Announcing The Winners
Winners of the 2008 Whizbang Garden Cart Contest will be publicly announced on January first of 2009 at this blog and at The Deliberate Agrarian.
If you mail in your entry, you will receive notice of contest winners by mail in January of 2009. Winners will receive their prizes in January of 2009 (in plenty of time to order seeds, plants, or whatever you want for the 2009 planting season).
Other Important Details
<>Those who enter this contest by posting an internet photo and commentary will be listed (with a link to their photo) at this blog.
<>Any photos and comments received by mail may be used by Whizbang Books for marketing purposes.
<>This cart contest, and the picking of all winners, will be conducted in a fair and honest manner. However, there will be no second or third party verification of the process. In other words, if you enter the contest, you must trust us to do it fairly.
<>Whizbang Books reserves the right to substitute similar prizes of equal value for the prizes listed above.
<>Only one entry per person or family is allowed.
<>Entrants who do not win a prize in the 2008 Garden Cart contest may re-enter next year’s contest.
<>Any questions about this contest and the rules should be directed to Whizbang Books. (whizbangbooks@bci.net). Whizbang Books reserves the right to modify these contest rules to further clarify them if needed.
Grand Prize: $100 gift certificate to Pinetree Garden Seeds (or another seed catalog of your choosing)
Second Prize: $50 gift certificate to Pinetree Garden Seeds (or another seed catalog of your choosing)
Third Prize $25 gift certificate to Pinetree Garden Seeds (or another seed catalog of your choosing)
Fourth Prize: $25 gift certificate to Pinetree Garden Seeds (or another seed catalog of your choosing)
Note: Pinetree Garden Seeds is currently the only seed company catalog that sells the Whizbang Garden Cart plan-book.
Here’s How to Enter The Contest
1. Build your own Whizbang Garden Cart using the plans found in the book, Anyone Can Build a Whizbang Garden Cart
2. Take a picture of your finished cart. The picture must show the cart in a natural setting (for example, a garden), and there must be at least one person in the picture.
3. Do one of the following:
a) Send the picture of your cart, along with your name and address , by postal mail to: Whizbang Books, P.O. Box 1117, Moravia, NY 13118
b) Post the picture of your cart, along with a short explanation about it to your blog, web site, or another internet location with its own linkable internet web address. Then e-mail the location to: whizbangbooks@bci.net The link must be viewable until at least the end of 2008.
Contest Deadline
All entries for the 2008 contest must be received by December 1st of 2008.
Here’s How Winners Will Be Chosen
Everyone who enters the contest will have their name written on a slip of paper and put into a box. On December 31st of 2008, Prize winners will be picked at random as follows:
The Grand Prize and Second Prize winners will be picked from a box containing the names of people who posted their cart picture with an explanation about it to the internet.
Then, the remaining names in that box will be added to the box of names from people who sent their photo through the mail. From these two combined groups, the Third Place and Fourth Place winners will be picked.
Announcing The Winners
Winners of the 2008 Whizbang Garden Cart Contest will be publicly announced on January first of 2009 at this blog and at The Deliberate Agrarian.
If you mail in your entry, you will receive notice of contest winners by mail in January of 2009. Winners will receive their prizes in January of 2009 (in plenty of time to order seeds, plants, or whatever you want for the 2009 planting season).
Other Important Details
<>Those who enter this contest by posting an internet photo and commentary will be listed (with a link to their photo) at this blog.
<>Any photos and comments received by mail may be used by Whizbang Books for marketing purposes.
<>This cart contest, and the picking of all winners, will be conducted in a fair and honest manner. However, there will be no second or third party verification of the process. In other words, if you enter the contest, you must trust us to do it fairly.
<>Whizbang Books reserves the right to substitute similar prizes of equal value for the prizes listed above.
<>Only one entry per person or family is allowed.
<>Entrants who do not win a prize in the 2008 Garden Cart contest may re-enter next year’s contest.
<>Any questions about this contest and the rules should be directed to Whizbang Books. (whizbangbooks@bci.net). Whizbang Books reserves the right to modify these contest rules to further clarify them if needed.
Tuesday, January 1, 2008
Announcing the 2007 Whizbang Garden Cart Winners
Well here it is January first of 2008 and it's time to announce the winners of the 2007 Whizbang Garden Cart Contest for 2007. I announced the contest HERE back in May.
There was only one entry before the deadline on December 1, 2007. Don & Caleb Underwood, a father and son team from Nebraska, built a Whizbang and entered it in the contest. You can read all about it HERE.
So Don & Caleb have not only made the first Whizbang Garden Cart, they win the First prize of a $100 gift certificate to Johnny's Seeds. I asked Don if he would rather have the gift certificate from another seed company. He requested Baker Creek Heirloom Seeds. So Baker Creek it is!
Don & Caleb... I received notice from Baker Creek yesterday that your gift certificate has been sent. You should get it in the next day or so. Congratulations and here's wishing you a great year of gardening with your Whizbang Garden Cart!
Oh, one more thing Don, congratulations to you and Gina on your 13th wedding anniversary.
Hey everyone else......
Stay tuned for details about the 2008 Whizbang Garden Cart Contest. I'll be posting them here in the next few days.
Here's wishing you all a great year in 2008.
Herrick Kimball
There was only one entry before the deadline on December 1, 2007. Don & Caleb Underwood, a father and son team from Nebraska, built a Whizbang and entered it in the contest. You can read all about it HERE.
So Don & Caleb have not only made the first Whizbang Garden Cart, they win the First prize of a $100 gift certificate to Johnny's Seeds. I asked Don if he would rather have the gift certificate from another seed company. He requested Baker Creek Heirloom Seeds. So Baker Creek it is!
Don & Caleb... I received notice from Baker Creek yesterday that your gift certificate has been sent. You should get it in the next day or so. Congratulations and here's wishing you a great year of gardening with your Whizbang Garden Cart!
Oh, one more thing Don, congratulations to you and Gina on your 13th wedding anniversary.
Hey everyone else......
Stay tuned for details about the 2008 Whizbang Garden Cart Contest. I'll be posting them here in the next few days.
Here's wishing you all a great year in 2008.
Herrick Kimball
Wednesday, August 29, 2007
2007 Cart Contest Online Entries
1. History has been made........
Don & Caleb Underwood in Arizona have built the FIRST (that I'm aware of) Whizbang Garden Cart! Don has written about and posted pictures of the cart at his blog. Here's a link: The Underwood's Whizbang Garden Cart.
Don & Caleb are now officially entered in the 2007 Whizbang Garden Cart Contest
========================
2. Who's next?
Don & Caleb Underwood in Arizona have built the FIRST (that I'm aware of) Whizbang Garden Cart! Don has written about and posted pictures of the cart at his blog. Here's a link: The Underwood's Whizbang Garden Cart.
Don & Caleb are now officially entered in the 2007 Whizbang Garden Cart Contest
========================
2. Who's next?
Sunday, June 3, 2007
The Whizbang Garden Cart Poultry Brooder
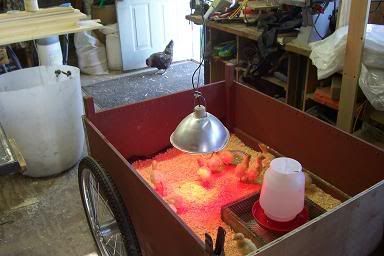
We recently bought a dozen day-old turkey chicks. I set up a simple temporary brooder for them inside my workshop using one of my Whizbang Garden Carts. The picture above pretty much tells the story (note the curious chicken that has come into the shop).
I layered some plastic in the bottom of the cart, dumped in some wood shavings, rigged up a heat lamp, added some food and water, and the chicks were safe and comfortable. Such a brooder is only good for a week or so before the birds start jumping out. But it was an easy way to get them off to a good start.
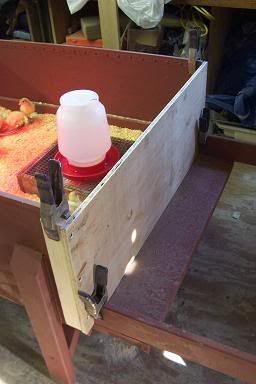
This next picture shows the plywood board I made to block off the open end of the cart. The plywood is notched to fit around the handles. A piece of pine board screwed to each end serves as a place to put a spring clamp and hold the board in place. Then a couple of spring clamps at the bottom, over the handle, hold the bottom in place. Since the cart is in my shop, there was no need to put a protective wire top over the cart, but that could have been done easily enough.
So, as you can see, the Whizbang Garden Cart isn’t just a hauler. You can even use it to get your poultry flock off to a good start.
To learn more about the homemade Whizbang Garden Cart and find out how you can get plans to build your own cart CLICK HERE
The Whizbang Garden Cart Portable Work Table
If you drive by my house, and look carefully, you will notice that two sides are nicely sided with cedar shakes. But part of the back and one side has tar paper on it. That’s the way it is when you build your house yourself, and you aren’t flush with money, and you have an aversion to borrowing. Which brings me to the following picture:
That’s a view that you won’t see driving by the front. Not pretty. But give me time. It’ll all come together in time. I plan to put a patio of paver brick off the back door. And maybe even a pergola over the patio. With grape vines growing over it. And, of course, I’ll finish the cedar siding.
Last week, however, I took time off from work to do other things on the house that needed doing. Specifically, I needed to remodel a bedroom upstairs. My three boys have been in the bedroom for 16 years. Marlene and I had the other bedroom in our house. We decided to switch bedrooms. They get ours (because it is bigger) and we get theirs. As you might imagine, after 16 years of boys living in the bedroom, it was in rough shape. I had to patch the drywall, skim coat the walls & ceiling, replace the window, put in a new door, put in all new trim, do some rewiring, paint, and wallpaper.
It was a lot of work but it is done now and Marlene couldn’t be more pleased. I did it all for her. After all, I sure didn’t need a new bedroom. I could sleep in a sleeping bag on an old mattress on the floor and be satisfied with that. But women aren’t like that. They like a real pretty bedroom. So that’s what we got.
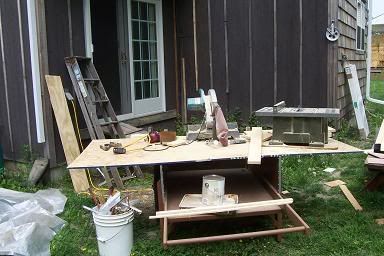
Well, anyway, the picture shows how I made a handy work surface for my chop saw and portable table saw, and assorted tools. I simply laid a partial sheet of plywood over the top of my Whizbang cart. The work surface is about 30” high which is perfectly suited to a work surface.
I put the plywood on at my workshop, loaded the tools on the work surface and inside the cart, then wheeled it all to where I wanted it. When I was done with work every night, I threw a plastic tarp over the whole thing and secured it with spring clamps on to the plywood. When the project was all done, I wheeled it back to my shop and unloaded everything.
So there you have an inexpensive, low-tech, and highly effective portavle work surface! And there you have an exceptionally handy cart!
=====================
To learn more about the homemade Whizbang Garden Cart and find out how you can get plans to build your own cart CLICK HERE
That’s a view that you won’t see driving by the front. Not pretty. But give me time. It’ll all come together in time. I plan to put a patio of paver brick off the back door. And maybe even a pergola over the patio. With grape vines growing over it. And, of course, I’ll finish the cedar siding.
Last week, however, I took time off from work to do other things on the house that needed doing. Specifically, I needed to remodel a bedroom upstairs. My three boys have been in the bedroom for 16 years. Marlene and I had the other bedroom in our house. We decided to switch bedrooms. They get ours (because it is bigger) and we get theirs. As you might imagine, after 16 years of boys living in the bedroom, it was in rough shape. I had to patch the drywall, skim coat the walls & ceiling, replace the window, put in a new door, put in all new trim, do some rewiring, paint, and wallpaper.
It was a lot of work but it is done now and Marlene couldn’t be more pleased. I did it all for her. After all, I sure didn’t need a new bedroom. I could sleep in a sleeping bag on an old mattress on the floor and be satisfied with that. But women aren’t like that. They like a real pretty bedroom. So that’s what we got.
Well, anyway, the picture shows how I made a handy work surface for my chop saw and portable table saw, and assorted tools. I simply laid a partial sheet of plywood over the top of my Whizbang cart. The work surface is about 30” high which is perfectly suited to a work surface.
I put the plywood on at my workshop, loaded the tools on the work surface and inside the cart, then wheeled it all to where I wanted it. When I was done with work every night, I threw a plastic tarp over the whole thing and secured it with spring clamps on to the plywood. When the project was all done, I wheeled it back to my shop and unloaded everything.
So there you have an inexpensive, low-tech, and highly effective portavle work surface! And there you have an exceptionally handy cart!
=====================
To learn more about the homemade Whizbang Garden Cart and find out how you can get plans to build your own cart CLICK HERE
Sunday, May 27, 2007
How Long Does it Take to Build a Whizbang Garden Cart?
Life is busy. Most all of us have a lot going on, especially if we are active in the garden or on a homestead. That means, if you need a garden cart, you probably don't have time to make your own. That's what you might be thinking to yourself as you consider this project. But, listen to me here.... you really should take the time for this little project. Let me tell you why:
First, the garden cart you make, using my step-by-step plans, is going to be a whole lot better cart than you can buy. It is stronger and tougher and more versatile. I have posted several stories to this blog illustrating these qualities. And I'll have a lot more stories to post in the weeks ahead.
Second, you should build this cart because you're going to be very pleased with yourself after you are finished. I say that at the risk of sounding trite or hokey because it's just plain true. Modern men (and women) rarely build things with their own hands and skills anymore. It's a whole lot easier to simply purchase all of our needs and wants, already prepared for us, from some place that specializes in fulfilling our needs and wants. But something important is lost when we do that. We loose the pleasure of creating with our own hands. We loose that quality of life that comes with creating for ourselves.
Third, your example is going to inspire others. When your friends and relatives see your homemade Whizbang Garden Cart, they are going to admire it and ask about it. You're going to tell them you made it yourself, and this will absolutely amaze them because nobody makes their own garden cart. As they take a closer look at your cart, one of two things will enter their mind. They will either see how simple the cart design is and begin to think that maybe they could actually build such a cart themselves, or they are going to think that maybe you can make them a cart too. This is where you tell them about my Whizbang Garden Cart plan book. You can even loan them your copy of the book (but I'd rather you encouraged them to buy their own copy from me). Whatever the case, you will have inspired your fellow man.
Fourth, and finally, you should build your own Whizbang Garden Cart because it is so doggone easy to do when you follow my plans, AND the project really won't take you all that long to complete.
If you have some basic woodworking tools and skills and experience, you can make the cart in a few hours. If it weren't for the need to wait for the polyurethane glue to dry before proceeding to different steps, I could personally build one of these garden carts in three hours. But, yes, I'm a master Whizbang Garden Cart Builder, so that's not a fair time to tell you.
So how about twice that--Six hours. Spread out over a few evenings, so the glue can have time to dry between steps. I think that amount of time will suffice for most folks.
Now, let me quickly add one caveat... if you are building the garden cart with a child or grandchild you don't want to rush it. Building a Whizbang Garden Cart is an excellent adult-child building project, and when that is the case, forget the time. Some things are just more important.
Oh, one more thing. We'll call it reason #5 for why you need to take time to build your own Whizbang Garden cart... It's a downright good value. You can build your own Whizbang Garden Cart for less than the cost of a factory-made cart, a cart that isn't nearly as solid and durable as the Whizbang.
===========
If you would like to learn more about the Whizbang Garden Cart and purchase a copy of the book, Anyone Can Build A Whizbang Garden Cart, CLICK HERE.
First, the garden cart you make, using my step-by-step plans, is going to be a whole lot better cart than you can buy. It is stronger and tougher and more versatile. I have posted several stories to this blog illustrating these qualities. And I'll have a lot more stories to post in the weeks ahead.
Second, you should build this cart because you're going to be very pleased with yourself after you are finished. I say that at the risk of sounding trite or hokey because it's just plain true. Modern men (and women) rarely build things with their own hands and skills anymore. It's a whole lot easier to simply purchase all of our needs and wants, already prepared for us, from some place that specializes in fulfilling our needs and wants. But something important is lost when we do that. We loose the pleasure of creating with our own hands. We loose that quality of life that comes with creating for ourselves.
Third, your example is going to inspire others. When your friends and relatives see your homemade Whizbang Garden Cart, they are going to admire it and ask about it. You're going to tell them you made it yourself, and this will absolutely amaze them because nobody makes their own garden cart. As they take a closer look at your cart, one of two things will enter their mind. They will either see how simple the cart design is and begin to think that maybe they could actually build such a cart themselves, or they are going to think that maybe you can make them a cart too. This is where you tell them about my Whizbang Garden Cart plan book. You can even loan them your copy of the book (but I'd rather you encouraged them to buy their own copy from me). Whatever the case, you will have inspired your fellow man.
Fourth, and finally, you should build your own Whizbang Garden Cart because it is so doggone easy to do when you follow my plans, AND the project really won't take you all that long to complete.
If you have some basic woodworking tools and skills and experience, you can make the cart in a few hours. If it weren't for the need to wait for the polyurethane glue to dry before proceeding to different steps, I could personally build one of these garden carts in three hours. But, yes, I'm a master Whizbang Garden Cart Builder, so that's not a fair time to tell you.
So how about twice that--Six hours. Spread out over a few evenings, so the glue can have time to dry between steps. I think that amount of time will suffice for most folks.
Now, let me quickly add one caveat... if you are building the garden cart with a child or grandchild you don't want to rush it. Building a Whizbang Garden Cart is an excellent adult-child building project, and when that is the case, forget the time. Some things are just more important.
Oh, one more thing. We'll call it reason #5 for why you need to take time to build your own Whizbang Garden cart... It's a downright good value. You can build your own Whizbang Garden Cart for less than the cost of a factory-made cart, a cart that isn't nearly as solid and durable as the Whizbang.
===========
If you would like to learn more about the Whizbang Garden Cart and purchase a copy of the book, Anyone Can Build A Whizbang Garden Cart, CLICK HERE.
What Are The Dimensions of The Whizbang Garden Cart?
My Whizbang Garden Cart is modeled after the old Garden Way Model #26, which is widely considered to be the best garden cart ever made. The Whizbang is, however, not an exact replica.
In the process of developing a cart that could be made by the average person with common woodworking tools and skills (instead of not-so-common metalworking tools & skills), and a cart that made efficient use of the fewest amount of materials, I needed to make some design modifications. But the Whizbang cart I came
up with maintains the three most endearing features of the old Model #26.Those features are a large carrying capacity, light weight, and great balance.
That said, many people who are interested in making their own Whizbang Garden Cart wonder what the cart’s actual dimensions are. Here are some of the critical measurements:
The total length of the cart, including the handle, is 69”
The total width of the cart, whcih means the distance from the end of the tire axle on one side to the end of the tire axle on the other side, is around 43-3/4”
The height of the cart from ground to the top of the plywood side is 28-3/4”
The inside-the-box height of the sides is 11-3/8"
The inside width of the plywood box (between both sides) is 33”
The length of the bottom of the cart, inside the box, is 48”
The length of the cart side panels is 43”
The clearance under the cart is 12-3/4”
I hope that helps those of you who are needing to know the dimensions of this cart.
To learn more about the cart and find out how you can order a copy
of my 45-page Whizbang Garden Cart construction manual, CLICK HERE
In the process of developing a cart that could be made by the average person with common woodworking tools and skills (instead of not-so-common metalworking tools & skills), and a cart that made efficient use of the fewest amount of materials, I needed to make some design modifications. But the Whizbang cart I came
up with maintains the three most endearing features of the old Model #26.Those features are a large carrying capacity, light weight, and great balance.
That said, many people who are interested in making their own Whizbang Garden Cart wonder what the cart’s actual dimensions are. Here are some of the critical measurements:
The total length of the cart, including the handle, is 69”
The total width of the cart, whcih means the distance from the end of the tire axle on one side to the end of the tire axle on the other side, is around 43-3/4”
The height of the cart from ground to the top of the plywood side is 28-3/4”
The inside-the-box height of the sides is 11-3/8"
The inside width of the plywood box (between both sides) is 33”
The length of the bottom of the cart, inside the box, is 48”
The length of the cart side panels is 43”
The clearance under the cart is 12-3/4”
I hope that helps those of you who are needing to know the dimensions of this cart.
To learn more about the cart and find out how you can order a copy
of my 45-page Whizbang Garden Cart construction manual, CLICK HERE
How Much Does it Cost to Build a Whizbang Garden Cart?
I was motivated to build my own garden cart after purchasing a good-quality, made-in-the-USA garden cart. Why, you might wonder, would I want another cart after just buying one? Because once I realized how incredibly useful and versatile one of these
two-wheeled, large capacity carts were, I knew I could use another.
As I explain in the Introduction to my Garden Cart plan book, I paid a total of $255 (shipping included) to buy that first factory-made cart. Current prices (including shipping) for such carts range from $260 to $320.
It is, of course, possible to get cheap Chinese versions of the cart. But when I buy or make something like a garden cart, which will see a lot of hard use on my homestead, I want it to be a solid and dependable tool for many years--preferrably a lifetime. This will not be the case with a cheap import garden cart. But it will be the case with a Homemade Whizbang Cart.
Bearing that in mind, let me tell you that making your own Whizbang Garden Cart will cost you less than buying one of those factory-made-in-the-USA models. And you will end up with a far better cart too. The Whizbang is more
sturdy and durable than any of the competition, while, amazingly, weighing in a couple pounds less. Now, as for how much it will actually cost you to build your own Whizbang Garden Cart, that will depend on how you approach the project.
If you decide to purchase all new parts to build your cart, you can expect to pay just under $200 for all the materials. However, there are ways to significantly reduct your expenditure for parts.
For example, I budget $18 for a 36” length of aluminum angle which gets cut into 16” lengths (with a hacksaw) and goes on the front corners of the cart. The angles serve as corner guards. That price is for brand new angle bought at Home Depot. A little imaginative scrounging at garage sales could turn up something else that could be used for the corner guard. You could even make it out of pieces of wood. You would save yourself $18 and the total cost for the cart materials would then be less than $182.
Then there is the wood dowel handle on the cart. I allocate $2.85 for this item. An old broom handle or other scrounged length of dowel-like wood will suffice, and that would bring the price of your cart materials down to less than $179.15.
Then there are the 1x4 boards neeed to build the cart. You’ll need four, 8-foot long, 1x4 pine boards to build your cart. I tell you to get two select quality (no knots) boards for the handles and two #2 quality boards for the other wood parts. Select boards cost 81 cents a foot (total: $12.96) and #2 boards cost 44 cents a foot (total: $7.04). If it happens that you already have some appropriate board material that you can utilize, you can further reduce your material cost by $20.00, which brings your total material cost down to less than 159.15.
The same thing goes for the one 8-foot-long 2x4 needed for this project. If you already have some 2x4 pieces that will do the job, you can save $3.00. Total cost for materials then goes to less than $156.15.
How about stain? I recommend that you paint your cart with a protective coating of wood preservative stain. I allocate $18 for this expense. Do you already have stain that you can use? If so, your cost of materials goes down to less than $138.15. If you don’t have any stain, perhaps you can find a can (or even a partial can) for next to nothing at a garage sale.
How about wood screws? You’ll need 100 at 1” long, 50 at 1-1/4” long and 25 at 2-1/2” long. Common drywall screws will suffice. If you already have these, you can save a few bucks more on the cost of wood screws.
The point I’m making here is that since the Whizbang Garden Cart is made of commonly available materials, there is a good chance you either have some of the components already on hand, or you can easily scrounge them. A little bit of scrounging on your part can reduce the price significantly.
In the Materials chapter of my cart plan book, I discuss The Scrounge Challenge. Here is a quote:
So there you have it. Figure around $200 for all new materials to build a Whizbang Cart. Or figure less (maybe a lot less) if you do some scrounging. In either event, I want to stress here is that, new parts or scrounged parts, you will end up with a whole lot more cart for less money when you build your own Whizbang Garden Cart. That’s what I call a Whizbang value!
===============
For more information about the Whizbang Garden cart and details about how you can get a copy of the book, Anyone Can Build A Whizbang Garden Cart, click HERE
two-wheeled, large capacity carts were, I knew I could use another.
As I explain in the Introduction to my Garden Cart plan book, I paid a total of $255 (shipping included) to buy that first factory-made cart. Current prices (including shipping) for such carts range from $260 to $320.
It is, of course, possible to get cheap Chinese versions of the cart. But when I buy or make something like a garden cart, which will see a lot of hard use on my homestead, I want it to be a solid and dependable tool for many years--preferrably a lifetime. This will not be the case with a cheap import garden cart. But it will be the case with a Homemade Whizbang Cart.
Bearing that in mind, let me tell you that making your own Whizbang Garden Cart will cost you less than buying one of those factory-made-in-the-USA models. And you will end up with a far better cart too. The Whizbang is more
sturdy and durable than any of the competition, while, amazingly, weighing in a couple pounds less. Now, as for how much it will actually cost you to build your own Whizbang Garden Cart, that will depend on how you approach the project.
If you decide to purchase all new parts to build your cart, you can expect to pay just under $200 for all the materials. However, there are ways to significantly reduct your expenditure for parts.
For example, I budget $18 for a 36” length of aluminum angle which gets cut into 16” lengths (with a hacksaw) and goes on the front corners of the cart. The angles serve as corner guards. That price is for brand new angle bought at Home Depot. A little imaginative scrounging at garage sales could turn up something else that could be used for the corner guard. You could even make it out of pieces of wood. You would save yourself $18 and the total cost for the cart materials would then be less than $182.
Then there is the wood dowel handle on the cart. I allocate $2.85 for this item. An old broom handle or other scrounged length of dowel-like wood will suffice, and that would bring the price of your cart materials down to less than $179.15.
Then there are the 1x4 boards neeed to build the cart. You’ll need four, 8-foot long, 1x4 pine boards to build your cart. I tell you to get two select quality (no knots) boards for the handles and two #2 quality boards for the other wood parts. Select boards cost 81 cents a foot (total: $12.96) and #2 boards cost 44 cents a foot (total: $7.04). If it happens that you already have some appropriate board material that you can utilize, you can further reduce your material cost by $20.00, which brings your total material cost down to less than 159.15.
The same thing goes for the one 8-foot-long 2x4 needed for this project. If you already have some 2x4 pieces that will do the job, you can save $3.00. Total cost for materials then goes to less than $156.15.
How about stain? I recommend that you paint your cart with a protective coating of wood preservative stain. I allocate $18 for this expense. Do you already have stain that you can use? If so, your cost of materials goes down to less than $138.15. If you don’t have any stain, perhaps you can find a can (or even a partial can) for next to nothing at a garage sale.
How about wood screws? You’ll need 100 at 1” long, 50 at 1-1/4” long and 25 at 2-1/2” long. Common drywall screws will suffice. If you already have these, you can save a few bucks more on the cost of wood screws.
The point I’m making here is that since the Whizbang Garden Cart is made of commonly available materials, there is a good chance you either have some of the components already on hand, or you can easily scrounge them. A little bit of scrounging on your part can reduce the price significantly.
In the Materials chapter of my cart plan book, I discuss The Scrounge Challenge. Here is a quote:
If you don’t already have a lot of the cart materials already on hand, I suggest you begin to collect the parts you need by visiting garage sales, junk stores, and thrift shops. Ask your friends and relatives if they have some of the needed components. You will be surprised what is lying around in garages and backyard junk piles, especially if you live in a rural area. If someone has something you need, make a trade.
I believe you can find just about every cart component, except the tires, from a season of focused cart parts scrounging. You should be able to purchase parts for pennies on the dollar this way. It’s a great little challenge.
If you have children or grandchildren, you can get them involved in the Scrounge Challenge too. Making a cart out of scrounged parts is a wonderful object lesson in thrift, resourcefulness, and recycling.
So there you have it. Figure around $200 for all new materials to build a Whizbang Cart. Or figure less (maybe a lot less) if you do some scrounging. In either event, I want to stress here is that, new parts or scrounged parts, you will end up with a whole lot more cart for less money when you build your own Whizbang Garden Cart. That’s what I call a Whizbang value!
===============
For more information about the Whizbang Garden cart and details about how you can get a copy of the book, Anyone Can Build A Whizbang Garden Cart, click HERE
Thursday, May 24, 2007
All About The Whizbang Cart Tires
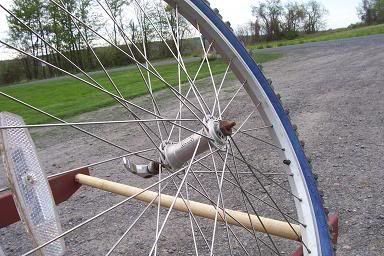
When I first gave some serious thought to building my own garden cart, I figured I would use some 26” bicycle tires for the cart tires. But when I looked at some actual bicycle tires, I couldn’t figure out how to make them work on the cart without complicating the design.
The problem with bicycle tires is that they are equipped with a short length of small-diameter threaded shaft, as shown in this next photograph...
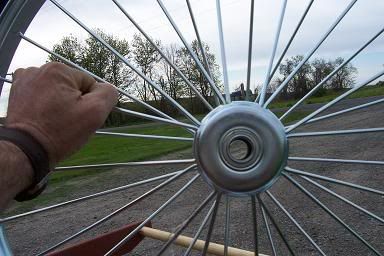
So I bought myself a couple of tires that were made specifically for a cart. They came with a ¾” axle hole. Around the axle hole on either side of the center hub is a ball bearing race. Here’s a picture of a cart tire...
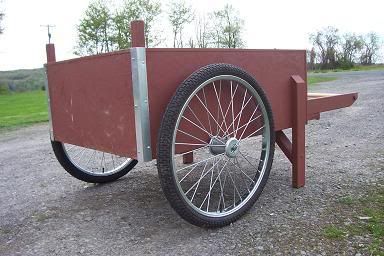
The cart tire is also built stronger than the bicycle tire. Significantly stronger. Here’s a picture of the cart tire on the cart...
The tires attach to the 3/4" diameter axle shaft that runs under the cart. They just slide on and are held in place by a hitch pin clip through a hole in the axle. Very simple. Very effective.
You are not going to find cart tires with a ¾” axle hole at your local Home Depot. But you can get them by mail from a company called Northern Tool & Equipment. Over the years, I have purchased tires to make five garden carts from this company and have found the tires to be of decent quality.They have never given me a problem.
Unfortunately, the tires are not made in the U.S. They are made in China. I searched for U.S.-made cart tires and was unable to find them. There are U.S. companies who sell tires that are made in their Chinese factory. But there are no U.S. cart tire manufacturers. If I’m wrong about that, someone please tell me.
In any event, the specific cart tire you need is Model #145123. Click on that link and it should take you right to the page where you can read about the tires and order them online. As I write this, the tires are on sale for $24.99 each. That’s a very good price. I paid the regular price of $27.99 each the last few tires I’ve bought. Either way, I think you will find that Northern’s price for these tires (which include the tire, tube, and rim) is as good as it gets. Once again, if I’m wrong about that, someone please let me know so I can let others know.
The problem with bicycle tires is that they are equipped with a short length of small-diameter threaded shaft, as shown in this next photograph...
So I bought myself a couple of tires that were made specifically for a cart. They came with a ¾” axle hole. Around the axle hole on either side of the center hub is a ball bearing race. Here’s a picture of a cart tire...
The cart tire is also built stronger than the bicycle tire. Significantly stronger. Here’s a picture of the cart tire on the cart...
The tires attach to the 3/4" diameter axle shaft that runs under the cart. They just slide on and are held in place by a hitch pin clip through a hole in the axle. Very simple. Very effective.
You are not going to find cart tires with a ¾” axle hole at your local Home Depot. But you can get them by mail from a company called Northern Tool & Equipment. Over the years, I have purchased tires to make five garden carts from this company and have found the tires to be of decent quality.They have never given me a problem.
Unfortunately, the tires are not made in the U.S. They are made in China. I searched for U.S.-made cart tires and was unable to find them. There are U.S. companies who sell tires that are made in their Chinese factory. But there are no U.S. cart tire manufacturers. If I’m wrong about that, someone please tell me.
In any event, the specific cart tire you need is Model #145123. Click on that link and it should take you right to the page where you can read about the tires and order them online. As I write this, the tires are on sale for $24.99 each. That’s a very good price. I paid the regular price of $27.99 each the last few tires I’ve bought. Either way, I think you will find that Northern’s price for these tires (which include the tire, tube, and rim) is as good as it gets. Once again, if I’m wrong about that, someone please let me know so I can let others know.
Build it Easy. Work it Hard. Love it Forever. Welcome To The Whizbang Garden Cart Blog...
The Whizbang Garden Cart is a homemade outdoor utility cart modeled after Lyman P. Wood’s famous Garden Way Model #26. The distinctive #26 is considered by most people to be the best garden cart design ever made.
Although the Garden Way company went out of business years ago, several companies now make their own versions of the old Model #26. But a decent quality factory-made cart will cost you dearly. That’s the situation that led me to develop plans for a homemade version of Garden Way’s famous utility cart.
This blog introduces you to the cart I developed. The following links will take you to many photos and stories about the Whizbang Cart. My hope is that you will be inspired to build your own cart by following the easy-to-understand plan book I’ve put together. The $14.95 (postage paid) book, titled Anyone Can Build A Whizbang Garden Cart, is a complete how-to manual with 45 pages and 75 illustrations.
Here is an index with links to all of the articles (and pictures) currently on this blog:
I Suggest You Start Here
Introducing The Whizbang Cart & How To Get A Copy Of The Planbook
You Can Read The Introduction To My Plan Book Here
Book Introduction
Here’s Some Articles About What Makes The Whizbang Cart So Special
It’s A Big Capacity Garden Cart
The Whizbang-Tough Difference
Build A Whizbang Garden Cart & You’re Eligible To Win Some Very Nice Prizes
2008 Whizbang Garden Cart Contest
The Whizbang Cart Is Incredibly Versatile
Twelve Turkeys in a Whizbang Garden Cart
Add Plywood For A Great Outdoor Work Surface
Oh, What A Dandy Picnic Table Mover!
The Whizbang Cart Will Last A Very Long Time If You Take Care Of It
Here’s How To Properly Maintain Your Cart (see my dependable old prototype Whizbang after its yearly spiffin’-up)
Here’s Some Cart Building How-To Information
All About The Cart Tires
Cutting The Plywood Parts
Drilling & Countersinking Screw Holes
Here’s An Old Carpenter’s Trick You Can Use
Putting On The Metal Edges
Frequently Asked Questions
How Long Does It Take To Build A Whizbang Garden Cart?
How Much Does It Cost To Build A Whizbang Cart?
What Are The Cart’s Dimensions?
If you have questions about the Whizbang Garden Cart, feel free to contact me by e-mail: hckimball@bci.net
Thanks for stopping by,
Herrick Kimball
Although the Garden Way company went out of business years ago, several companies now make their own versions of the old Model #26. But a decent quality factory-made cart will cost you dearly. That’s the situation that led me to develop plans for a homemade version of Garden Way’s famous utility cart.
This blog introduces you to the cart I developed. The following links will take you to many photos and stories about the Whizbang Cart. My hope is that you will be inspired to build your own cart by following the easy-to-understand plan book I’ve put together. The $14.95 (postage paid) book, titled Anyone Can Build A Whizbang Garden Cart, is a complete how-to manual with 45 pages and 75 illustrations.
Here is an index with links to all of the articles (and pictures) currently on this blog:
I Suggest You Start Here
Introducing The Whizbang Cart & How To Get A Copy Of The Planbook
You Can Read The Introduction To My Plan Book Here
Book Introduction
Here’s Some Articles About What Makes The Whizbang Cart So Special
It’s A Big Capacity Garden Cart
The Whizbang-Tough Difference
Build A Whizbang Garden Cart & You’re Eligible To Win Some Very Nice Prizes
2008 Whizbang Garden Cart Contest
The Whizbang Cart Is Incredibly Versatile
Twelve Turkeys in a Whizbang Garden Cart
Add Plywood For A Great Outdoor Work Surface
Oh, What A Dandy Picnic Table Mover!
The Whizbang Cart Will Last A Very Long Time If You Take Care Of It
Here’s How To Properly Maintain Your Cart (see my dependable old prototype Whizbang after its yearly spiffin’-up)
Here’s Some Cart Building How-To Information
All About The Cart Tires
Cutting The Plywood Parts
Drilling & Countersinking Screw Holes
Here’s An Old Carpenter’s Trick You Can Use
Putting On The Metal Edges
Frequently Asked Questions
How Long Does It Take To Build A Whizbang Garden Cart?
How Much Does It Cost To Build A Whizbang Cart?
What Are The Cart’s Dimensions?
If you have questions about the Whizbang Garden Cart, feel free to contact me by e-mail: hckimball@bci.net
Thanks for stopping by,
Herrick Kimball
Whizbang Picnic Table Mover
Years ago, when my wife Marlene and I were just married and I was starting out in the building trades, we lived with Marlene’s parents, Jay and Evelyn Myers. It was not a bad thing living with my inlaws. Jay and Evelyn were good people and staying with them for a few years allowed us to save enough money to buy some land. Then Marlene and I built our home (I tell about this in my book Writings of a Deliberate Agrarian).
Marlene’s parents lived on a busy road. I decided to take advantage of the traffic and make some extra money by making and selling picnic tables. I made the tables in Jay’s barn out behind the house. Then I put one out by the road with a sign and the price. They sold very well. When we eventually moved into our own home, I stopped selling the tables, and Jay took over the business. He was a retired diary farmer looking for something to do. Making the tables was just perfect for him.
Well, Jay passed away ten years ago, but Marlene and I still have one of the 8-foot-long picnic tables he made. It’s showing it’s age but is still together and functional . It’s also heavy and hard to move, which brings me to the Whizbang Picnic Table Mover.
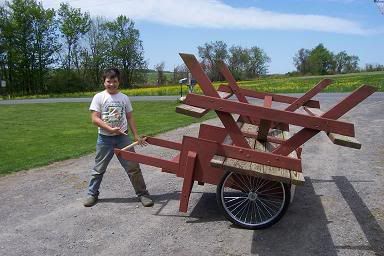
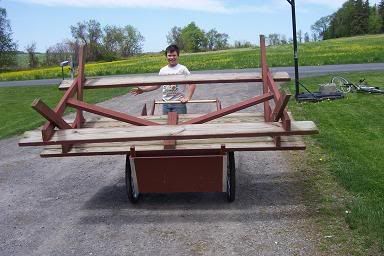
That’s my 12-year-old son, James, with the very heavy and awkward picnic table on our Whizbang Garden Cart. I put it on the cart myself by simply tipping one side up, positioning the cart up to the tipped table, and flopping it over onto the cart. It’s a simple thing to do once you’ve done it. The extended corner blocks (which I call “horns”) on the dump-end of the cart secure the table so it doesn’t slide off. Wheeling it around is a whole lot easier than trying to carry it. Here’s another picture….
This story illustrates the incredible versatility of the Whizbang. To learn more about the Whizbang Garden Cart and find out how you can get a copy of the book, Anyone Can Build A Whizbang Garden Cart, click on this link.
Marlene’s parents lived on a busy road. I decided to take advantage of the traffic and make some extra money by making and selling picnic tables. I made the tables in Jay’s barn out behind the house. Then I put one out by the road with a sign and the price. They sold very well. When we eventually moved into our own home, I stopped selling the tables, and Jay took over the business. He was a retired diary farmer looking for something to do. Making the tables was just perfect for him.
Well, Jay passed away ten years ago, but Marlene and I still have one of the 8-foot-long picnic tables he made. It’s showing it’s age but is still together and functional . It’s also heavy and hard to move, which brings me to the Whizbang Picnic Table Mover.
That’s my 12-year-old son, James, with the very heavy and awkward picnic table on our Whizbang Garden Cart. I put it on the cart myself by simply tipping one side up, positioning the cart up to the tipped table, and flopping it over onto the cart. It’s a simple thing to do once you’ve done it. The extended corner blocks (which I call “horns”) on the dump-end of the cart secure the table so it doesn’t slide off. Wheeling it around is a whole lot easier than trying to carry it. Here’s another picture….
This story illustrates the incredible versatility of the Whizbang. To learn more about the Whizbang Garden Cart and find out how you can get a copy of the book, Anyone Can Build A Whizbang Garden Cart, click on this link.
Here's How to Properly Maintain Your Whizbang Garden Cart
A homemade Whizbang Garden Cart weighs a tad less than the popular factory-made versions, but it is more sturdy and durable. And, if made according to the plan I provide in my instruction manual, Anyone Can Build A Whizbang Garden Cart, the Whizbang will stand up to the elements of sun, rain, and snow remarkably well. Even still, some routine maintenance is needed if you want the Whizbang cart you make to last a lifetime. That is, after all, the case with any outdoor implement.
Bearing that in mind, the bearings on the cart tires should get a periodic spritz of aerosol silicone. You don’t have to take anything apart to get to the bearings, as you would do on an automobile. All you have to do is spray onto the hub around the axle and give the tire a spin to work the dry lubricant into the bearing raceway. To get to the bearings on the side of the tire towards the cart, you’ll have to remove the tire. But that’s easy. Just pull the hitch pin clip that holds the tire on to the axle shaft and the tire slides right off. Nothing could be easier.
The only other item of regular maintenance is to periodically paint on a fresh coat of protective stain. If you use your cart a lot, and leave it out in the elements all year long, as I have done with mine, it will get dowdy looking and develop some surface cracks in the plywood. Re-staining will make it look like new and help to seal the cracks.
My original Whizbang Garden Cart is now going into its fourth season of hard use here on my homestead. I recently re-stained it and took a couple of pictures. Here’s the first...
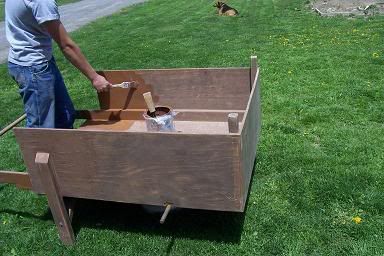
In the above picture I have removed the cart’s tires and the metal corner guard on the dump-front end. I also removed the metal J-Bead, which was never properly secured (as I show in this blog essay). Then I used an orbital sander with a sheet of 80-grit paper to quickly sand over the flat surfaces of the cart. I didn’t sand it down to bare wood. I just sanded to level and clean the surface. It’s a simple thing to do.
Finally, I balanced the cart on a plastic pail in the yard and brushed on the stain. That gallon can you see in the picture is the same can of stain that I used when I first made the cart. This fourth coat just about emptied the can. In my plan book, I recommend that you purchase a gallon of good-quality stain and save it for future re-stainings. The lid on my can of stain got ruined last year so I wrapped the whole can in plastic wrap and it kept just fine. Here’s the restained cart...
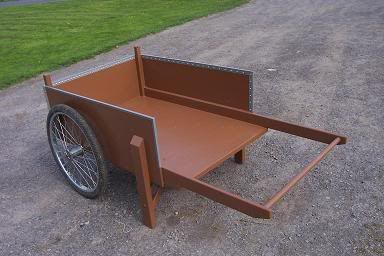
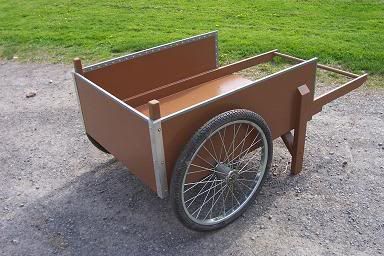
Now that’s a beautiful specimen of a Whizbang Garden Cart, if I don’t say so myself. You’ll notice that I have properly affixed a new length of metal J-bead over the plywood edges. The cart is going into its fourth season of use and abuse and it not only looks like new, it still works like new. By the way, even though it has been out in the rain and snow, and has been used to haul soggy wet materials for the past years, and is a little beat up (if you could look more closely, you would see come minor dents and chips), the cart shown absolutley no sign of wood decay. That’s a Whizbang cart for you!! Here’s another view…..
To find out more about the Whizbang Garden Cart and learn how to get a copy of my plan book, check out this link.
Bearing that in mind, the bearings on the cart tires should get a periodic spritz of aerosol silicone. You don’t have to take anything apart to get to the bearings, as you would do on an automobile. All you have to do is spray onto the hub around the axle and give the tire a spin to work the dry lubricant into the bearing raceway. To get to the bearings on the side of the tire towards the cart, you’ll have to remove the tire. But that’s easy. Just pull the hitch pin clip that holds the tire on to the axle shaft and the tire slides right off. Nothing could be easier.
The only other item of regular maintenance is to periodically paint on a fresh coat of protective stain. If you use your cart a lot, and leave it out in the elements all year long, as I have done with mine, it will get dowdy looking and develop some surface cracks in the plywood. Re-staining will make it look like new and help to seal the cracks.
My original Whizbang Garden Cart is now going into its fourth season of hard use here on my homestead. I recently re-stained it and took a couple of pictures. Here’s the first...
In the above picture I have removed the cart’s tires and the metal corner guard on the dump-front end. I also removed the metal J-Bead, which was never properly secured (as I show in this blog essay). Then I used an orbital sander with a sheet of 80-grit paper to quickly sand over the flat surfaces of the cart. I didn’t sand it down to bare wood. I just sanded to level and clean the surface. It’s a simple thing to do.
Finally, I balanced the cart on a plastic pail in the yard and brushed on the stain. That gallon can you see in the picture is the same can of stain that I used when I first made the cart. This fourth coat just about emptied the can. In my plan book, I recommend that you purchase a gallon of good-quality stain and save it for future re-stainings. The lid on my can of stain got ruined last year so I wrapped the whole can in plastic wrap and it kept just fine. Here’s the restained cart...
Now that’s a beautiful specimen of a Whizbang Garden Cart, if I don’t say so myself. You’ll notice that I have properly affixed a new length of metal J-bead over the plywood edges. The cart is going into its fourth season of use and abuse and it not only looks like new, it still works like new. By the way, even though it has been out in the rain and snow, and has been used to haul soggy wet materials for the past years, and is a little beat up (if you could look more closely, you would see come minor dents and chips), the cart shown absolutley no sign of wood decay. That’s a Whizbang cart for you!! Here’s another view…..
To find out more about the Whizbang Garden Cart and learn how to get a copy of my plan book, check out this link.
Sunday, May 13, 2007
Puttin’ On The Metal Edges
In my book, Anyone Can Build A Whizbang Garden Cart, I provide easy-to-follow instructions for making an outdoor utility cart that will serve you faithfully for many, many years. With that objective in mind, I have designed the cart with some specific features. One such design feature is a protective metal strip that fits over the exposed edges of the plywood sides.
The edge I recommend you use is galvanized metal drywall J-Bead which is commonly available in most any lumberyard and is very inexpensive. If you are familiar with J-bead you may be thinking to yourself:” That stuff is kind of lightweight, isn’t it?”
Yes it is. But when you have glued and screwed it over the edge of ½” plywood (which it happens to fit over perfectly) the metal protects the wood from moisture penetration and provides surprising durability to the edge. So, by itself, the J-Bead is flimsy, but once secured to the plywood, it is not.
As I said, the J-Bead is glued and screwed over the plywood edges. This is done after you have cut the plywood pieces to size, then marked and drilled holes for every screw, as is clearly explained in my book. The glue I strongly recommend is polyurethane glue. I strongly recommend it because it is waterproof glue. A common brand of polyurethane glue is Gorilla Glue. You’ll find Gorilla Glue in any Home Depot or Lowes home center.
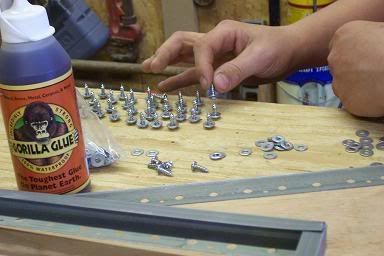
The above picture shows a piece of metal J-Bead, attachment screws, and Gorilla Glue.
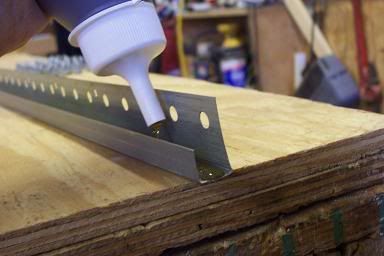
This picture shows the Gorilla Glue being applied to the J-Bead prior to putting it on the plywood edge. Just squeeze a bead of the maple-syrup-consistency adhesive along the bottom of the channel.
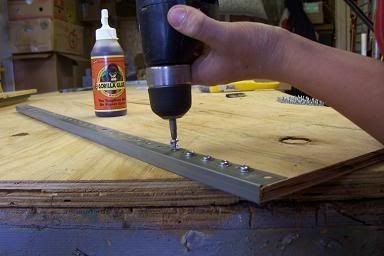
In the above photo my son James is driving screws into the J-Bead. The J-Bead has ¼” diameter holes punched 1” apart along the one edge. That edge is positioned on the inside of the cart. The J-Bead is then pushed down tight to the plywood. On the cart sides, one screw with a washer under its head is driven in every other hole (2” apart). On the dump-end panel, a screw and washer is driven into every hole (1” apart). James is putting screws into the dump end panel in this picture.
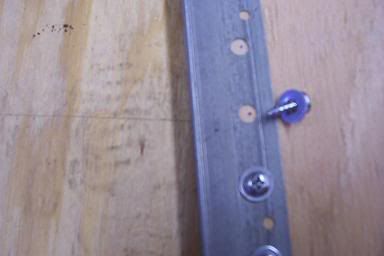
The picture above shows the placement of the screws in the holes. Each screw is driven just below the center of the hole. This placement assures that the screw holds the J-Bead down just right. If you drove the screws too low, they would deform the metal. If you drove them too high, they would wedge the metal edge away from the plywood. So, just below the center is where they go and it isn’t a hard thing to do. My son is twelve and he did this task just fine.
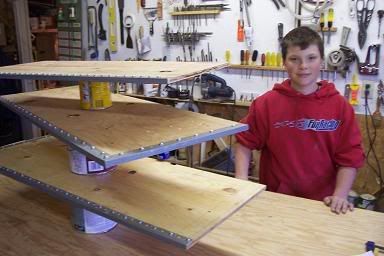
One of the distinctive attributes of Gorilla Glue is that it swells when it is curing. It will swell out from under the edges of the J-Bead. Then it dries to a hard, foam-like consistency which you will have to clean off. In the picture above I have stacked the two cart sides and the dump-end panel on paint cans to cure. You’ll see why in the next picture
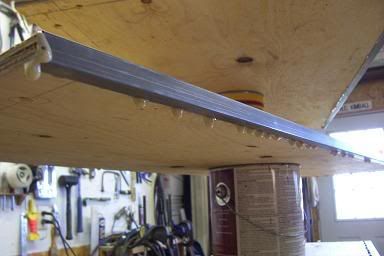
As you can see in this picture, the glue does, indeed, swell out from under the J-Bead. If the cart sides were laid aside in a vertical position (instead of horizontal on the paint cans) the glue ooze would run down the plywood faces and cleaning it off would be harder. So that’s why you need to stack the sides on the cans.
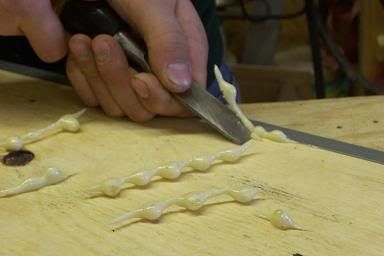
A sharp chisel makes short work of cleaning the dried glue ooze-out off as James is showing in the above picture.
As you can see, putting the protective metal edge on the cart sides is a simple process. It so happens that building the whole Whizbang Garden Cart is a simple process, especially when you take it one logical step at a time. My plan book, Anyone Can Build A Whizbang Garden Cart provides you with a simple, logical, one-step-at-a-time instructions.
And once you've made your own Whizbang Garden Cart, you can enter it in the Whizbang Garden Cart Contest, as explained here.
The edge I recommend you use is galvanized metal drywall J-Bead which is commonly available in most any lumberyard and is very inexpensive. If you are familiar with J-bead you may be thinking to yourself:” That stuff is kind of lightweight, isn’t it?”
Yes it is. But when you have glued and screwed it over the edge of ½” plywood (which it happens to fit over perfectly) the metal protects the wood from moisture penetration and provides surprising durability to the edge. So, by itself, the J-Bead is flimsy, but once secured to the plywood, it is not.
As I said, the J-Bead is glued and screwed over the plywood edges. This is done after you have cut the plywood pieces to size, then marked and drilled holes for every screw, as is clearly explained in my book. The glue I strongly recommend is polyurethane glue. I strongly recommend it because it is waterproof glue. A common brand of polyurethane glue is Gorilla Glue. You’ll find Gorilla Glue in any Home Depot or Lowes home center.
The above picture shows a piece of metal J-Bead, attachment screws, and Gorilla Glue.
This picture shows the Gorilla Glue being applied to the J-Bead prior to putting it on the plywood edge. Just squeeze a bead of the maple-syrup-consistency adhesive along the bottom of the channel.
In the above photo my son James is driving screws into the J-Bead. The J-Bead has ¼” diameter holes punched 1” apart along the one edge. That edge is positioned on the inside of the cart. The J-Bead is then pushed down tight to the plywood. On the cart sides, one screw with a washer under its head is driven in every other hole (2” apart). On the dump-end panel, a screw and washer is driven into every hole (1” apart). James is putting screws into the dump end panel in this picture.
The picture above shows the placement of the screws in the holes. Each screw is driven just below the center of the hole. This placement assures that the screw holds the J-Bead down just right. If you drove the screws too low, they would deform the metal. If you drove them too high, they would wedge the metal edge away from the plywood. So, just below the center is where they go and it isn’t a hard thing to do. My son is twelve and he did this task just fine.
One of the distinctive attributes of Gorilla Glue is that it swells when it is curing. It will swell out from under the edges of the J-Bead. Then it dries to a hard, foam-like consistency which you will have to clean off. In the picture above I have stacked the two cart sides and the dump-end panel on paint cans to cure. You’ll see why in the next picture
As you can see in this picture, the glue does, indeed, swell out from under the J-Bead. If the cart sides were laid aside in a vertical position (instead of horizontal on the paint cans) the glue ooze would run down the plywood faces and cleaning it off would be harder. So that’s why you need to stack the sides on the cans.
A sharp chisel makes short work of cleaning the dried glue ooze-out off as James is showing in the above picture.
As you can see, putting the protective metal edge on the cart sides is a simple process. It so happens that building the whole Whizbang Garden Cart is a simple process, especially when you take it one logical step at a time. My plan book, Anyone Can Build A Whizbang Garden Cart provides you with a simple, logical, one-step-at-a-time instructions.
And once you've made your own Whizbang Garden Cart, you can enter it in the Whizbang Garden Cart Contest, as explained here.
Subscribe to:
Posts (Atom)