This web site (one of my first on the web) is now old, confusing, and totally outdated. I'm in the process of developing a new Planet Whizbang web site and will remove this entire site when it's ready. For now, you can still pick your way through these pages and learn about the cart. The good news is that the plan book is still in print and available from me (Herrick Kimball) for only $14.95 at THIS LINK . An inexpensive PDF download of the book is also available.
Tuesday, March 12, 2019
Friday, January 2, 2009
Announcing The 2008 Whizbang Cart Contest Winners
There were six entries in the 2008 Whizbang Garden Cart Contest. We have had the official drawing (from a hat) of the winners. They are as follows:
First Place Winner: David Larson in Connecticut wins a $100 gift certificate to a seed catalog company of his choice.
Second Place Winner: Bantry Bay Farm in New Brunswick, Canada, wins a $50 gift certificate to a seed catalog company of their choice.
Third Place Winner: Gabe Acrich in California wins a $25 gift certificate to a seed catalog company of his choice.
Fourth Place Winner: Dana Buckley in North Carolina wins a $25 gift certificate to a seed company of her choice.
Congratulations to each of the winners!
And to the other two entrants who did not win a prize but are, nevertheless, still winners in my mind.
The winners will be hearing from me in the next day or two. If you do not get an email from me, please send me an e-mail at: hckimball@bci.net
For those who would like to know how to build a Whizbang Garden Cart, check out my book, Anyone Can Build A Whizbang Garden Cart
Saturday, November 22, 2008
David Larson's Connecticut Cart

David Larson in Connecticut has built himself a new Whizbang Garden Cart. As you can see from the pictures, it is a fine looking and very practical cart. Here are some comments excerpted from a couple of e-mails from David.
”Enclosed are a couple of photos of my Whizbang cart. As you can see,
my wife, Sandi, is enjoying the cart as well. I attached the legs on the
back with toggle head nuts so they can be easily removed and reaattached
via preexisting holes in the vertical position if needed.
I also created a workbench surface of 4 ft square plywood which collapses in
approx one half size by means of a piano hinge. It has two sets of ~2inch
square holes...one set is at the edge of the plywood allowing a flush fit at one
of the four sides; the other set is offset by 7 inches allowing a 7 inch overhang
on three of the four sides.
I must congratulate you on creating the finest set of plans I have ever seen. Once I rounded up the proper materials, I followed your plans almost to the letter and have been pleasantly surprised on how well everything has come together. Again, you have done a superlative job! Thank you!
I do believe your estimate of six hours to construct this wagon reflects your twenty years of carpentry expertise... It took me 2-3 times that and I have had some fair experience with woodworking projects. I am certainly not complaining....
I had a thoroughly great time with this project and am sure I will enjoy it for the next 40 years or so (I am only 66 yrs old at this point...).”
Nice job David. Thanks for the positive feedback and inspiring pictures. With only eight days until the 2008 Whizbang Garden Cart Contest deadline, you are officially entered. The drawing will be on January 1st 2009.

Saturday, November 15, 2008
A North Carolina Beauty...

Wow, there’s another beautiful Whizbang Garden Cart! That one was made by Dana Buckley in North Carolina. Dana wrote this about the plucker planbook:
"Thanks for writing such great, easy to follow instructions! It wasn't hard to build at all."And here is what she wrote about making the cart:
"I built this Whizbang garden cart with a little help from my husband and my dad (my dad has a table saw), but mostly by myself. I had a hard time finding the metal j-bead and I had to order the metal rod for the axle. No one around here had anything longer than three feet in stock. I think finding the j-bead was the hardest part of the project. I had wanted a nice garden cart for awhile, but when we got the horses this year, I really needed one. My daughter and I use it a lot. It is great to carry feed from the car to the barn and carry hay out to the pasture in the winter. It also makes a nice muck cart. I decided to stain it red to match the barn. But the wood I bought for the handles had such pretty grain, I couldn't cover it up. So I used a transparent, natural color stain on them. I think it turned out really nice."It sure did turn out really nice, Dana. Thanks for your inspiring example.
You are now officially entered in this year’s Whizbang Garden Cart Contest. Thanks

Sunday, November 9, 2008
Bantry Bay Farm's Whizbang Garden Cart

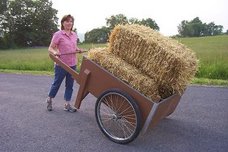
Congrats to Luke McLean at Bantry Bay Farm in Bayside, New Brunswick, Canada for building a Whizbang Garden Cart, and putting it to good use on their farm. Bantry Bay grows a variety of produce and sells direct to the community via a local farmer's market and CSA. The picture above shows the Bantry Bay Whizbang with a load of parsnip tops. I love to see pictures of the Whizbang at work!
Back in March of this year, Luke wrote the following in the farm's blog:
"Mike and I built a garden cart. Now, we didn't really know how to build a garden cart, but there was quite a bit of information on the internet, including a guy with his own blog and manual on how to build a good garden cart almost entirely from common building supplies. He calls it the Whizbang Garden cart. We ordered his manual and built ourselves a whizbang. I'm glad we did, because it's really a great cart. I doubt it would have been as durable or balanced had we built it on our own. We'll post some pictures at a later date. If you're interested in building your own, or just learning more about garden carts, here's his link: gardencartblog.blogspot.com"
Nice cart, Luke. Your Bantry Bay Whizbang is now officially entered in the 2008 Whizbang Garden Cart Contest.


Saturday, May 24, 2008
Tevye's Russian Whizbang Milk Cart
(2008 Contest Entry #2)

That “old” garden cart is actually not as old as it looks. I’ll let Gabe Acrich from Colfax, California tell the story:
"My wife Sarah has been putting on community theatre plays for many years. Sound of Music , Oliver etc. etc. Lots of adults and tons of kids. The kids pass the hat at the end of the play and all the money goes to a charitable organization. Well this year it's Fiddler on the Roof. The lead character and center stage the entire show will be "the Garden Cart". It will serve as the sewing table , the master bed, turned on it's end the wedding backdrop, the Sabbath table and last but not least Tevye's milk cart.
Now for the building of the cart. Everything except a fresh sheet of plywood and the wheels came from the boneyard. It's amazing how much I had in order to build this and that's prior to adding all the extra aged wood to make the cart appear authentic. We searched high and low on the internet for wheels. Too expensive, not authentic, or shipping was too high. We took a car trip from our home in N. California through Arizona to New Mexico. Not for wheels in particular but we did take the van just in case. On our last day in New Mexico , there they were, perfect. And 26 inches as an added bonus. We had forgotten the size we needed but would have bought almost any size and made it work.
The first cast party had a pile of wood and tools awaiting everyone. We built the whole thing in three hours with about 7 men. 2 build and five watch and drink beer. The greatest idea was the extra axle support added at the last minute. It looks just like the leg support but shorter. It comes down just a few inches below the cart bottom and the axle goes through it as well. It adds a good deal more support for these extra heavy wheels. (sorry ,you can barely see the top of it over the wheel in this picture) Except for the wheels and support, and all the extra wood for looks, we followed the plans exactly. Oh, we also widened the cart by 1 foot. No metal across the top either. We gorilla glued the heck out of everything. Let it dry and painted the plywood.
I'll send you I picture while it's up on stage but that's many months away."
Thanks Gabe. That’s a fine cart. I wish you the best with the play, and I wish you the best as Entry #2 in this year’s Whizbang Garden Cart Contest.
Friday, March 28, 2008
2008 Cart Contest Entry #1

John Hudson (a.k.a., The Ancient Mariner) built that smart-looking Whizbang Garden Cart pictured above. The photo below shows Mary Hudson (a.k.a., "The Boss" or "Head Mess Cook" or "First Mate") with the unpainted cart.
The Hudsons live in Alabama. These pictures, and John's comments below constitute entry #1 in the 2008 Whizbang Garden Cart Contest.

Here's What Mr. Hudson had to say about his Whizbang Cart:
"The famous or infamous cart is finished. Materials pretty much as in the plan. 5-ply Ext grade Douglas fir plywood. Douglas fir for the handles, the rest pine. Unable to get the thin J-bead. Most around here is plastic. Finally found some heavy metal j-bead, gauged out to 1/32 inch and edges rolled and crimped. Little harder to work. Had to drill holes. But did the job. Finished with two coats Behr solid color premium deck, fence and siding stain.
Couple of mistakes
1. I read with interest the use of duct tape for masking when gluing. I have plenty of duct tapes so I promptly grabbed some blue painters masking tape and carefully masked it. Not a Good idea!! My only excuse is old age. I turned 80 in November of 07.
2. I’m a fan of coated deck screws so where possible I bought them rather then the plain wood screws. The inch & 1/4 worked fine. Didn’t notice the 2 & 1/2 were #10 so fastening the bottom to the handles heard a crack Figured I might have drilled crooked. Did the next, another crack. Turned the cart over, saw two partial splits in my nice straight grained fir handles. Removed the offending screws. Dawned on me that these were size 10 rather then 8. Redrilled the pilot holes , repaired the cracked spots and all ok. Don’t have a table saw for ripping . Picked up a gadget (ACU-RIP) for my skill saw and was able to do the required rip in the two by four. The cart was made primarily for the wife. So she wanted barn red She will name it at a later date."
Nice Job John! Thank you for your sharing your Whizbang Garden Cart with the rest of the world. I hope it inspires others to get their cart done and enter it in the contest.
Subscribe to:
Posts (Atom)